


Zoom vs. Scaling in After Effects
Have you ever been working in After Effects and suddenly lost sight of the picture? We mean literally. “Why does my shape layer look pixelated? I thought vectors were resolution independent?” “I need to zoom in farther? Why won’t After Effects let me do it?” These questions often come up for those newer to After Effects. While the difference between scaling and zooming is pretty straightforward, awareness of the details of both viewport zooming and scaling in AE can help your process.
Hey all! I’m Sara Wade and today I’m going to clear up a common point of confusion for beginning After Effects users. We’re going to talk about the difference between viewport zooming and viewport scaling. Even seasoned After Effects pros need to remind ourselves of these details when we view a vector at 400% zoom and it looks like a pile of messy pixels.
In this video, you’ll learn:
{{lead-magnet}}

The main difference between zooming and scaling has to do with which variable is being changed in your composition. When you zoom in on your viewport, you are affecting the magnification control. When you scale, you are affecting the object.
Have you ever had this problem? You try to scale an object in After Effects and it ends up more pixelated than original Mario. The problem is likely how you've set up your composition, so let's have a look. For this example, I set up two composition windows: a Bitmap Plant on the left, and a Vector Plant on the right.
The main difference between the two is that bitmaps are made of pixels, whereas vectors are made of points and instructions, meaning they are resolution independent. This means I can zoom in without any loss in quality.
When I zoom in on the Bitmap Plant to 800%, you'll see what I mean.
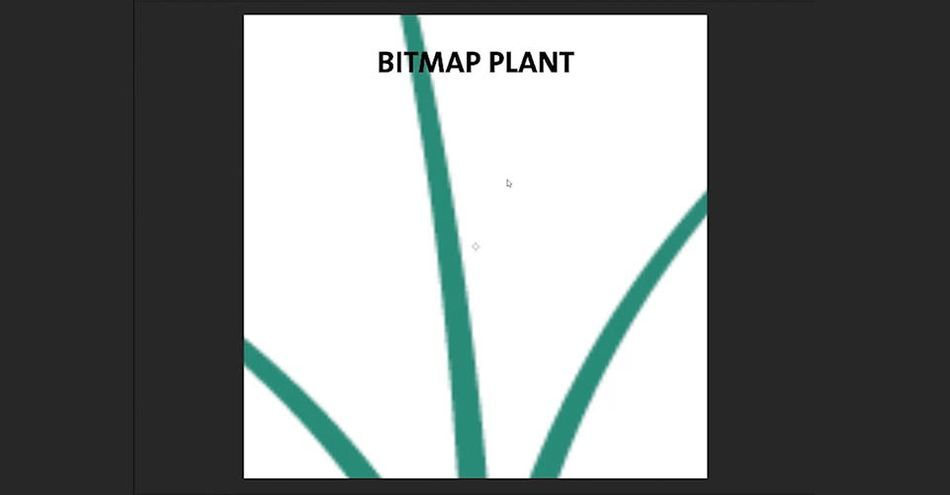
The image is fuzzy, pixelated, and just not that fun to look at. Now, if I do the same thing to my vector art...
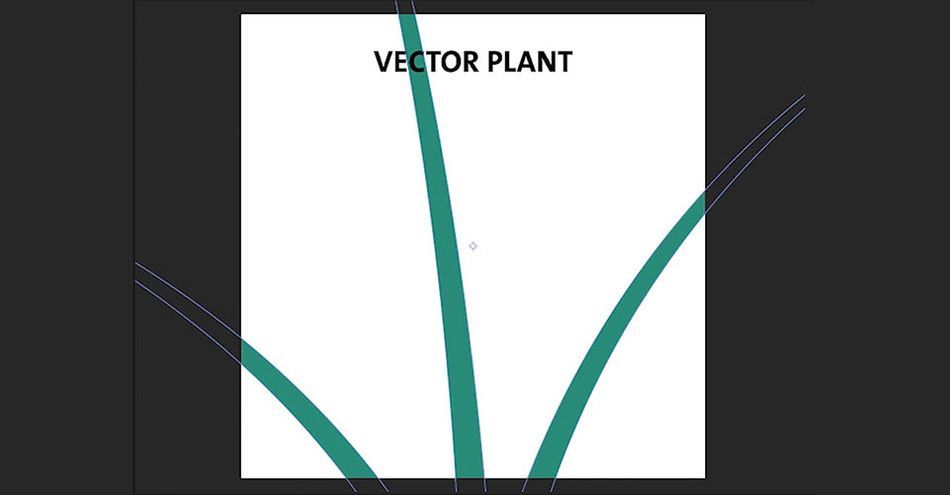
Crisp as a New England morning. Since the vector art is using points and a formula rather than colored pixels, it creates a sharp image at any resolution. If you are scaling a vector image and you see pixelation, check that the Continuously Rasterize box is unchecked. After Effects is trying to rasterize your image, which affects the image quality.
But what about if we try zooming in?
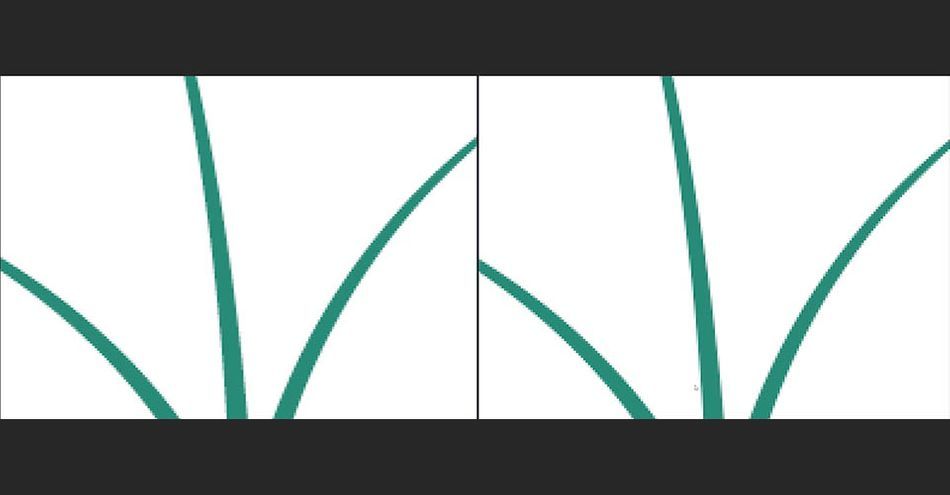
Wait a minute! Why are both of my images pixelated? As we said before, zooming affects the magnification controls. After Effects renders vector previews before zooming, which is why both images appear blurry.
You know us; we LIVE for keyboard shortcuts. If you're not rocking the hotkeys, what are you even doing? So we made a quick list of some of the most important ones to use in the Viewport.
- Zoom in (comp, layer, footage) - Period (.)
- Zoom out (comp, layer, footage) - Comma (,)
- Zoom to 100% (comp, layer, footage) - Forward Slash (/) on main keyboard
- Zoom to fit (comp, layer, footage) - shift + (/) on main keyboard
- Zoom to fit up to 100% (comp, layer, footage) - Alt or Option + (/) on main keyboard
- Set resolution to full in comp panel - CTRL + J, CMD + J
- Set resolution to half in comp panel - CTRL + Shift + J, CMD + Shift + J
- Set resolution to custom in comp panel - CTRL + ALT + J, CMD + OPT + J
Other useful viewport shortcuts:
- Toggle show/hide safe zones - Apostrophe (')
- Toggle show/hide grid - CTRL + '
- Toggle show/hide proportional grid - ALT + '
- Toggle show/hide rulers - CTRL + R
- Toggle show/hide guides - CTRL + ;
- Toggle show/hide layer controls (masks, motion paths, light/camera wireframes, effect controls points, layer handles) - CTRL + Shift + H
- Toggle grid snap - CTRL + Shift + ‘
- Toggle guide snap - CTRL + Shift + ;
- Toggle guides locked = CTRL + ALT + Shift + ;
Want to learn even more about the Viewport in After Effects? Watch the rest of our video above!
We just zoomed through that tutorial
That’s it! Pretty simple, huh? Next time the pixelation gremlin strikes, you will know exactly what to do. If you want to learn more about After Effects with the help of industry pros, check out After Effects Kickstart from School of Motion.
After Effects Kickstart is the ultimate After Effects intro course for motion designers. In this course, you'll learn the most commonly used tools and best practices for using them while mastering the After Effects interface.
-----------------------------------------------------------------------------------------------------------------------------------
Tutorial Full Transcript Below 👇:
Sarah Wade (00:00): Hi everyone. I'm Sarah Wade. And today I'm going to clear up a common point of confusion for beginning after effects users. We're going to talk about the difference between viewport, zooming and viewport scaling. In this video. You'll learn the difference between scaling and zooming, how scaling and zooming effect vectors like imported illustrator artwork, or shape layers, viewport limitations in after effects and shortcut keys to speed up your workflow.
Music (00:28):[intro music]
Sarah Wade (00:41): Okay. In after effects, I've got two composition windows. Side-by-side the left side composition and the left side timeline are a bitmap PNG image, right? Bitmaps are made up of pixels. We all know this, or most of us know this. If you're new to this stuff like brand new, basically bitmaps are made up of pixels and vectors are made up of a set of instructions and points for points and where to draw lines and curves and so on. So vectors are resolution independent and bitmaps are not. So if I zoom in on this bitmap on the left, or let's say, if I scale this bitmap on the left, I'm going to hit the S key and let's scale it to let's try 800%. And now we see the stem. It's quite pixelated. It's not looking good at all. We can basically see, this is not smooth, right?
Sarah Wade (01:34): But if I go to this factor version, which I've imported from Adobe illustrator, and you know, you can see that this is all basically a shape layer. So everything in here is fills and paths. It's all vector based. So now, if I grabbed this one and I hit S and I scale this to the same percentage, it's perfectly smooth, right? This is what we expect. But sometimes you are looking at a vector and you're thinking, oh my gosh, my vector is pixelated. What's going on now, if you are looking at a vector and it is looking pixelated in the viewport and your viewport is at a hundred percent, you're a hundred percent sure that it's a hundred percent. There is one other way that can happen. So this is a vector shape layer. This is a text layer. These both have this little star icon here right now.
Sarah Wade (02:21): This is the collapsed transformations and continuously rasterize button. Now what continuously rasterize means is that after effects is going to continuously, rasterize this thing, rather than just doing it. Once, when you start working with the comp, it's going to do that continuously. So if you scale up and down, it's going to continuously update basically the resolution of that vector. Now, if we go back to a hundred percent and we pre-com this, and let's just call this plant pre-com. Now, if I hit that esky and I start scaling this to 800%, it's looking pixelated. And the reason is because that continuously rasterized button, it is checked by default. When you import a shape layer, or you add a text layer, are you out of shape? But it is not when you do a pre-call. So if I check that fixes the problem. So that is the first place to check.
Sarah Wade (03:18): Now let's take a look at the difference between zooming and scaling. So I have scaled these and they look great. Let's go back to 100% for both of them. Okay? So now these look exactly the same, right? Because they are both at a hundred percent and this one is not pixelated at all, because it's at its native resolution. This one is not pixilated at all, because it's a vector, but now I'm going to zoom in to let's try 800%. And that looks pixelated. Okay. And 800%, oh no, my vectors pixelated, to what am I going to do? What's happening here. So what you're doing here, when you hit these buttons, or you hit control plus, or command plus, or minus to zoom in and out, right, going like this in an end, what you're doing there is you are changing the magnification control, right. Of how you were viewing this.
Sarah Wade (04:13): So no matter what you set your quality to right now, minus set to full quality, right? So this should be full quality. And if it's a vector at 800%, you think, oh gosh, it shouldn't be scaled. Zooming is changing the magnification ratio. And after effects actually renders those vector objects before zooming, which is basically just scaling the object for preview. So after effects, renders the vector, and then when you preview it, it scales that render up. So you're not seeing that perfectly smooth vector. And the reason is because of the way after effects, renders, zooming. So if you see this in your own work, and you're a new after effects user, or maybe you're a pro like me, and you just forgot, this is likely the problem. Just check this magnification here, take that back to 100%. And if you scale your vector up, I assure you, it will look lovely. And even if you're zoomed into 800% here, looking at this, it looks bad, but it's actually a vector. It's going to look fine. If you render it at a hundred percent, even if you scale this up to let's see 800% and let's scale this one to 800.
Sarah Wade (05:27): So now we're seeing 800% zoomed and scaled, right? They both look pretty bad. The vector actually looks slightly better, but I'm slightly cleaner at any rate. Um, okay. So, but if you were to render both of these files, your vector is going to render perfectly scaled to 800%. Even though it looks bad zoomed to 800%. Because again, if I go back to a hundred percent, looks perfect, right? If I go back to a hundred percent on this, bitmap does not look perfect. So this hundred percent preview is what your render is going to look like. So you see a vector that looks pixelated in your viewport. Don't panic, check this number right here. And that should get you sorted
Sarah Wade (06:14): While we're here. Let's talk about some handy shortcuts you can use and the view port. So if you want to scale in and out, but you don't want to use this little gadget right here, you can actually use the comma key and the period key to zoom from the center of the viewport. So I'm using the comma and that is zooming out and the period is going to zoom in. Now, again, I'm zooming. So things look a little pixelated and that's okay. So that is a handy-dandy shortcut. So say you get really zoomed in or really zoomed out and, or things are off center because you've used that space bar to sort of pan around and you want to get that centered back just the way this bitmap one is on the left. You can actually hit the alt key or the option key on the Mac and the forward slash button.
Sarah Wade (07:07): And that is going to center that up just perfectly in the middle of your view. Those are probably my most used shortcuts, but there are a couple more shortcuts we can talk about today. Now this happened to work out to be a hundred percent when I hit the alt key and the forward slash key. But what if my windows bigger? And I want this to go as big as it possibly can. Well, I can use the shift key and the forward slash to do that. So alt or option forward slash we'll get it to a hundred percent and shift forward slash we'll get it to the maximum size that will fit in this window.
Sarah Wade (07:54): Now let's talk a little bit about what all this stuff here does in the viewport, right? So we already learned about the magnification tool. And again, you can do this by selecting here. You can use the control plus and control minus. You can use the period key and the comma key as well. Um, or again, you can just use these fit up to a hundred percent or fit, or, you know, whatever you want to select from this menu. Now, here, next to this, we have some different choices. We can choose Otto full half, third quarter or custom. Now what this does is auto basically lets after effects say, I'm feeling good today. I have a lot of processing power. I'm going to choose full resolution or maybe you've got a lot of windows open in Chrome or you've got a lot of other apps running.
Sarah Wade (08:45): And after effects might say, you know what? I'm running a little slow right now. I'm going to auto set myself to half or maybe quarter, or you can do that yourself. If you're working a very heavy file and you just want your previews to be faster, you can choose half. You can choose third. You can even choose quarter or you can pick a custom amount and then type that in. And basically when you do this and you can see that in that customer resolution dialogue that came up, you're telling after effects. When you're previewing only render every four pixels, you could even say only render every eight pixels and every eight pixels vertically. And that's going to give you, you know, it's not a great preview, but again, this is just the preview. When you render, it's going to look like it would look at full resolution.
Sarah Wade (09:32): I do this frequently. I will work in half or third or even quarter. If I've got a file with a lot of particle effects or just a lot of shape layers, a lot of expressions, basically anytime after effects starts to slow down your previews, you can speed that up by going into this menu and just downgrading your visual a little bit. You can't always do that. Sometimes you need that visual precision to work, but sometimes you can get away with half or even third or quarter. Okay, what is next? This is the preview quality. Okay. So what we can do here is we can enable or disable fast previews, right? So off means what you're seeing in this windows. The final quality and after effects is going to do its best to render that in preview mode, using as much Ram as it can possibly use based on how much room you have available.
Sarah Wade (10:21): The next one we have is adaptive resolution, right? So long story short after effects is going to down sample the footage and whatnot. Basically, it's going to kind of change the resolution of things to be a little bit less pretty, but it's going to, again, help things to speed up as you work next, we've got this wire frame mode, which is actually, it's good for just kind of setting things up, right? So I can't see anything because this was just one shape layer. But if I had a bunch of different layers in here with a bunch of different things, I would see outlines just like this right now I'm seeing one outline for the houseplant layer and one for the text that says vector plant. So that can be really useful if you've got a ton of stuff to set up and arrange and you don't want to actually wait for after effects to catch up to what you're doing.
Sarah Wade (11:14): So you can also again, click this preferences and you can set all of that up. However you want to, and your own after effects, preferences, you can again set like your default adaptive resolution, all these different things. We're not going to go into all this on detail. This is a little bit beyond the beginner tutorial, but for now you should be able to work with what you know about just this enabling or disabling or again, doing to wireframe. So I'm going to turn that off. Oh, just so you can see what adaptive resolution looks like. Not much different with this one, but if I started animating stuff, we might see a difference there let's turn that back off. Okay. We've got some more buttons to go over, but these are going to be pretty quick. So this one toggles, the transparency grid. You can't see it because I don't have anything in there, but if I move this over, I've got a transparency grid.
Sarah Wade (12:02): Now, if I turn that off, this is my composition background color. As many of you know, your composition background color is a setting in the composition. It is not an actual object. So if you send this to media encoder to render, it's not going to render this background color of blue. It's just going to actually render a transparency or black. If you're rendering to some, an image format or a video format that does not have transparency. So keeping this actually toggled on as a great way to see where you need to add stuff, right? If you're working on something and your background, all of a sudden your render looks completely different. It's got a weird black background that you didn't put there. Probably you're seeing your composition background and not realizing that you didn't have an actual background. The other thing that can get a little bit confusing, especially if you are brand new, is this next button, which basically turns on and off your layer controls.
Sarah Wade (12:59): So if I were to actually the title of it is toggle mask and shape path visibility. But if I were to let's say draw a bunch of stuff like that. And then I turn this off. Now I can't see any in that stuff. Right? Like I drew a thing, I'm selecting a thing, but I can't see any of those points anymore. And that's a little bit confusing, right? You know, if you're not seeing your handles and stuff like that, turn that back on and there, now I can see the points. Now I can see the handles. If you have animation, you would see the motion path. So let's undo that ugly shapes that we made and get back to normal. And see, now I can't even see the points in this, right. But if I turn this off, none of that shows up. All I see are these corner points.
Sarah Wade (13:48): So if you're missing things in your viewport that you, you don't know what you did, you might've accidentally hit this button right here. Another thing that comes up, especially for beginners is you could accidentally hit this region of interest button. And then all of a sudden, your cursor looks like this little kind of plus sign. And all you can do is grab stuff, right? Not ideal. What this is used for is actually say, I wanted to use this plant, but I didn't want that whole composition anymore. I can use this button here to select a region of interest. And then I can go to the composition menu and say crop the comp to the region of interest. And if I do that, then my comp is no longer. I think this is 10 80 wide by 10 80 tall. It's no longer that wide. It's only as wide as this region of interest.
Sarah Wade (14:35): I'm going to turn that off though, because I actually want the whole comp. So you see that plus sign and can't do anything else. That's probably what's going on. Just uncheck that button, um, grid and guide options. Again, you can set your grid to be on. You can set your, to be on. This is useful for dragging guides in and out. Let's say I want a guide for the edge of the pot, right? I can just grab one here. And let's say I wanted to actually at the top of the pot, just drag one down from up here, there are also some shortcut keys that are very handy for turning these guides and grids on and off. If I want to toggle these rulers on and off, I can do that by hitting control. Are they go off, hit it again? They come back just toggles infinitely.
Sarah Wade (15:22): If I want these grid to go off or on that's control and the button is the apostrophe, um, or command. If you're on a Mac, this is going to be command apostrophe or command R let's say, I want those guides to turn off. That's going to be control or command. Plus the semi-colon. Now everything is off. What if I want to see what my safe sounds are, right? The title safe zone. I can just hit that apostrophe key by itself. And that's going to show me that, okay, whatever, I'm viewing this on like a television or different monitors that crop things, different resolutions, this area in the middle is the safe zone, right? So that's what I'm viewing here. When I use that shortcut key. And if you wanted to get to that on and off without using the shortcut key, you can do all of that stuff right here.
Sarah Wade (16:14): Title action, safe, proportional grid. The shortcut key for turning that proportional grid on and off is alt plus the, uh, apostrophe key. So that's the proportional grid, right? And the regular grid again is the control plus that in this case, they're the same, but they're not always the same. So that's how you get to all that stuff here. We've got some color stuff over here, basically. This is just how you want to view it. I just want to view greens. Just one of you, the alpha there's no alpha in this to view, everything's got a shape over it. I'm going to just leave this in RGB, but you can dig into that if you need to and you just want to see, oh, just what do I have? That's in the blue range. Um, that's kind of stuff is helpful if you get into compositing and, um, all of that visual effects type of workflow stuff.
Sarah Wade (17:05): Okay. Resetting the exposure. So you can adjust this in after effects to act like different exposure levels, right? Like different light exposure levels like you would have in a camera minus 12 is obviously too far, minus two is going to make it darker. Basically you go higher. It's going to make it brighter. Um, as if you were opening the camera lens or setting an F stop, if you accidentally type something in there, your image looks a little bit weird. Like this one does, you can reset that exposure by hitting that button right there. I hope that these tips are helpful and I hope they've cleared up some questions for those of you who are new to using all of these complicated viewport tools and after effects. And for those of you that maybe aren't new and like me just, um, never explored all of these tools for one reason or another.
Sarah Wade (17:57): That's it pretty simple. Right? Next time, the pixelation gremlin strikes you'll know what to do. Hit subscribe. If you want more tips like this one and be sure to download the handy PDF. That includes all of the shortcut keys that we discussed today. And then some, if you want to learn more about aftereffects with the help of industry pros, check out after effects, kickstart from school of motion. If you want to learn how to make vector artwork like that, we used in this example today, check out Photoshop and illustrator unleashed also from school of motion. That's all for now. And thanks for watching. Bye
Music (18:32): [outro music].

Dive into real-time 3D with our Unreal Engine beginner's course by Jonathan Winbush. Master importing assets, world-building, animation, and cinematic sequences to create stunning 3D renders in no time! Perfect for motion designers ready to level up.
Explore this Course ➔
Unlock the secrets of character design in this dynamic course! Explore shape language, anatomy rules, and motifs to craft animation-ready characters. Gain drawing tips, hacks, and Procreate mastery (or any drawing app). Ideal for artists seeking to elevate their craft.
Explore this Course ➔
Elevate your freelance motion design career with our guide to client success. Master a repeatable method for finding, contacting, and landing clients. Learn to identify prospects, nurture leads, and develop a thriving freelance philosophy amidst chaos.
Explore this Course ➔
Rev up your editing skills with After Effects! Learn to use it for everyday needs and craft dynamic templates (Mogrts) for smarter teamwork. You'll master creating animated graphics, removing unwanted elements, tracking graphics, and making customizable templates.
Explore this Course ➔
Stand out with Demo Reel Dash! Learn to spotlight your best work and market your unique brand of magic. By the end, you'll have a brand new demo reel and a custom campaign to showcase yourself to an audience aligned with your career goals.
Explore this Course ➔
Illuminate your 3D skills with Lights, Camera, Render! Dive deep into advanced Cinema 4D techniques with David Ariew. Master core cinematography skills, gain valuable assets, and learn tools and best practices to create stunning work that wows clients.
Explore this Course ➔
Master After Effects at your own pace with Jake Bartlett's beginner course. Perfect for video editors, you'll learn to create stylish animated graphics, remove unwanted elements, and track graphics into shots. By the end, you'll be equipped for everyday AE needs and more.
Explore this Course ➔Revolutionize your Premiere workflow with customizable AE templates! Master creating dynamic Motion Graphics Templates (Mogrts) in After Effects to speed up your team's work. By the end, you'll craft easily-customizable templates for seamless use in Premiere Pro.
Explore this Course ➔

Not sure where to start?
If you’re a beginner, here are some great courses to help you get started:

After Effects Kickstart
Dive into the fundamentals of motion design with our most popular (and recently updated) After Effects course.

Photoshop + Illustrator Unleashed
Master the basics of Photoshop and Illustrator and gain invaluable insights in this introductory level course.

Design Kickstart
An introduction to the design principles behind all great work.
More Advanced?
If you’re a more advanced student looking to up your game, here are some great options:

Animation Bootcamp
Learn the art and principles of creating beautiful movements in Adobe After Effects.

Design Bootcamp
Learn to design for motion in this intermediate-level, project-based course.
Cinema 4D Basecamp
Learn Cinema 4D from the ground up in this exciting introductory C4D course.
Now is the time to learn the skills you need to advance in your motion design career:


