


Achieve Stunning Results by Mimicking Photographic Effects in 3D
We're going to take a look at ways you can improve your Cinema 4D renders using Octane and Redshift. By the end of this process, you'll have a better understanding of a professional 3D workflow, a better handle on the tools you'll use, and more confidence in your end results. In this tutorial, we're going to take a look at how mimicking photographic effects improves your renders.
You'll learn how to:
- Use bokeh to enhance shallow depth of field
- Desaturate your highlights in-render and add bloom
- Effectively use lens flare, vignetting, and lens distortion
- Add effects such as chromatic aberration and motion blur
In addition to the video, we've created a custom PDF with these tips so you never have to search for answers. Download the free file below so you can follow along, and for your future reference.
{{lead-magnet}}

If you study lenses and all their properties, you’re way more likely to create a beautiful render. There are a lot of these properties to look at, so let’s jump in. Before we get started, let's define a few key terms: Depth of Field and Bokeh.
Depth of Field is the distance between the nearest and the farthest objects that are in acceptably sharp focus in an image. Landscapes tend to have a deep depth of field, while portraits or macrophotography tend to have shallow depths of field.
Bokeh is the blurred effect seen in the out-of-focus potion of a photo taken with shallow depth of field.
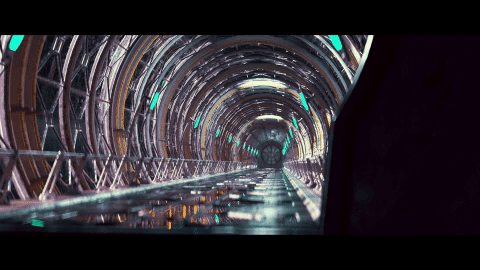
With shallow depth of field comes many different flavors of bokeh. For example, here’s a sci-fi tunnel render I created without shallow depth of field. When we add some in, it immediately looks more photographic. Then when I crank the aperture, we can really see the bokeh.

In my render we’ve got the standard bokeh from Octane, but if I turn up the aperture edge, we get a more semitransparent center to the bokeh and a more defined edge, which happens in cameras and looks more natural to me.
Next, we can play with various shapes. By taking down the roundness, we can create hexagonal bokeh, which happens with lenses with only six blades in their aperture. We can also stretch out the bokeh to a 2:1 aspect and create anamorphic bokeh, because anamorphic lenses have an oval shaped aperture.

One property of lenses is that as the highlights get brighter, they desaturate. Many renderers have a way to mimic this effect in-render. For example, here in octane there’s a saturate to white slider. Here’s what the neon lights in the tunnel look like before that, just an unrealistic flat saturated color, and here’s what it looks like after. Now we’ve got a nice white hot core that falls off to a saturated color, and that’s much more realistic.


Another common photographic effect is blooming highlights: a subtle amount of glow that happens to the highest highlights when light bounces around in the lens. We can turn on the bloom in Octane, but too often I see artists crank the effect too high across the board. Thankfully, Octane now has a cutoff slider which allows for only the highest highlights to bloom out. A little goes a long way here but it creates a nice soft effect that gets away from the overly crisp and harsh look of CG.

Similar to bloom are lens flares. This effect comes from light bouncing around and refracting in the various lens elements, and is often used as an intentional stylistic effect. Stronger light sources such as the sun typically flare out. If you want to go the extra mile, it can be great to composite these in with something like Video Copilot’s Optical Flares. At some point, Otoy has plans to add true 3D flares into Octane, and that’ll be much easier than comping them in.

Lenses also have various kinds of distortion, which isn’t usually accounted for by default in 3D. An obvious example is a fisheye lens, and recently I used this heavy barrel distortion look in some concert visuals for Keith Urban. Here’s the shot before, and after. It can create some additional believability because we’re used to seeing various levels of distortion in photos and in film.

Next, we’ve got chromatic aberration, and this is another one that I feel many artists overuse. Often the easiest way to add this effect is by splitting the R G and B channels and then offsetting them by a couple pixels in various directions.
With Octane, the solution is a bit weirder. I attach a glass sphere to just in front of the camera and up the dispersion slightly, which creates a similar RGB split. It’s a bit more render intensive, but creates a more true chromatic aberration, and a cheaper solution for this is coming soon to Octane.


Motion blur is another effect that we associate with film and video, but is also often used in photography when the shutter is left open longer than normal. Sometimes this can be a great effect to imply motion in our renders.
For instance, here’s a render of some cars supposedly racing, but it doesn’t feel fast in just a still, and here’s the render with motion blur.

To do this, I’m just attaching the camera to the same null that’s moving the car, and then putting an Octane object tag on the car so Octane knows that it’s moving in relation to the camera.

Another option is to just animate the camera with a couple keyframes and turn on motion blur for a POV shot.
We used real-world references to make our renders more realistic, and the same is true for mimicking real-world lens effects. Now that you understand a little more about depth of field, bokeh, highlights, and distortions, the rest is up to you. Experiment with these techniques and you will find your renders look more professional and interesting. Now go create something amazing!
Want more?
If you're ready to step into the next level of 3D design, we've got a course that's just right for you. Introducing Lights, Camera, Render, an in-depth advanced Cinema 4D course from David Ariew.
This course will teach you all of the invaluable skills that make up the core of cinematography, helping to propel your career to the next level. You’ll not only learn how to create a high-end professional render every time by mastering cinematic concepts, but you’ll be introduced to valuable assets, tools, and best practices that are critical to creating stunning work that will wow your clients!
-----------------------------------------------------------------------------------------------------------------------------------
Tutorial Full Transcript Below 👇:
David Ariew (00:00): I'm going to show you how to mimic photographic effects in 3d to achieve some stunning results.
David Ariew (00:13): Hey, what's up, I'm David Ariew and I'm a 3d motion designer and ed ucator, and I'm going to help you make your renders better. In this video, you'll learn how to create various types of bokeh to enhance the shallow depth of field in your renders and simulate different kinds of lenses de saturate your highlights in render and add tasteful amounts of bloom effectively use lens, flares, vignetting, and lens distortion, and add in effects like chromatic, aberration, motion, blur, and film grain. If you want more ideas to improve your vendors, make sure to grab our PDF of 10 tips in the description. Now let's get started. If you study lenses and all their properties, you're way more likely to create a beautiful render. There are a lot of these properties to look at. So let's jump in first off. They're shallow depth of field, which is pretty obvious, but with shallowed up, the field comes many different flavors of bokeh that you might not be aware of.
David Ariew (00:58): For example, here's a scifi tunnel render I created without shallow depth of field. When we add some in it immediately looks more photographic. Now, when I crank the aperture, we can really see the bokeh here. We've got the standard bokeh and octane, but if I go over here and turn up the aperture edge, we get a more semi-transparent center to the bokeh and a more defined edge, which happens in cameras and looks more natural to me. Next, we can play with various shapes by taking down the roundness. We can create hexagonal bokeh, which happens with lenses with only six blades in their aperture. We can also stretch out the bokeh to a two to one aspect and create anamorphic bokeh because anamorphic lenses have an oval shaped aperture. I tend to gravitate towards this look because anamorphic lenses are just really pretty. Another property of lenses.
David Ariew (01:39): You may not have thought of is that as the highlights get brighter, they de saturate many renders have a way to mimic this effect. In render, for example, here in octane, there's a saturate to white slider. Here's what the neon lights and the tunnel looked like before that just an unrealistic, flat, saturated color. And here's what it looks like after now. We've got a nice white hot core that falls off to a saturated color, and that's much more realistic. Another common photographic effect is blooming highlights or just a subtle amount of glow that happens to the highest highlights when light bounces around inside the lens here in octane, we can turn on the bloom, but this is something I see far too often when artists crank the bloom and it's applied to everything across the board, thankfully octane now has a cut-off slider, which allows for only the highest highlights to bloom out a little goes a long way here, but it creates a nice soft effect that gets away from that overly crisp and harsh look of CG.
David Ariew (02:28): Similar to bloom is lens flares. And I probably don't need to mention these as everyone pretty much knows about them. This effect comes from the light bouncing around and refracting in the various lens elements and is often used as an intentional stylistic effect, very strong sources like the sun typically flare out. So if you want to go the extra mile, it can be great to composite these in with something like video co-pilots optical flares at some 0.0, toy has plans to add in true three flares into octane too. So that'll be awesome and much easier than comping them in another big photographic effect is vignetting. And one reason I like to do this in render versus an after effects is that it will actually recover highlights on the edges of frame versus here and after effects. Where if I bring down the white point, we just clamped the values down to gray lenses.
David Ariew (03:10): Also have various kinds of distortion, which isn't usually accounted for by default in 3d. An obvious example is a fish islands. And recently I used this heavy barrel distortion look in some concert visuals for Keith urban here's the shot before and after it can create some additional believability because we're used to seeing various levels of distortion in photos and in film next we've got chromatic aberration, and this is another one that I feel many artists overuse. Often the easiest is just to add this effect and after effects by splitting the red, green and blue channels. And then by offsetting them on the edges of frame with optics compensation, one copy of the effect that distorts outwards and another, that distorts inwards, and then recombining them Redshift can actually pull in an image like one of these to create a super nice chromatic aberration in render with octane.
David Ariew (03:54): The solution is a bit weirder, but for now, the way I'm doing it in 3d is to attach a glass sphere to just in front of the camera and up the dispersion slightly, which creates a similar RGB split. It's a bit more render intensive, but creates a more true chromatic aberration and a cheaper solution for this is coming soon to octane to motion. Blur is another effect that we associate with film and video, but is often used in photography, for instance, streaking water or star trails, or just the motion blur from people dancing. This happens when the shutter is left, open longer than normal. Sometimes this can be a great effect to imply motion in our renders. For instance, here's a render of some cars I created. They're supposedly racing, but it doesn't feel very fast because there's nothing to imply that motion. Once we add the motion blur in, it feels a lot more dynamic to do this. I'm just attaching the camera to the same Knoll. That's moving the car and then putting an octane object tag on the car. So that octane knows that it's moving in relation to the camera without the tag of the car. We'll just streak out to here's several more renders from this set.
David Ariew (04:56): Another option could be to just animate the camera with a couple of key frames and then turn on motion blur for a POV shot in our cyber punk city. Like this. Finally film grain can be a nice photographic effect to add some texture if it's not overdone. And the add grain filter in after effects is great for this. By keeping these tips in mind, you'll be well on your way to consistently creating awesome renders. If you want to learn more ways to improve your renders, make sure to subscribe to this channel, hit the bell icon. So you'll be notified when we dropped the next tip.

Dive into real-time 3D with our Unreal Engine beginner's course by Jonathan Winbush. Master importing assets, world-building, animation, and cinematic sequences to create stunning 3D renders in no time! Perfect for motion designers ready to level up.
Explore this Course ➔
Unlock the secrets of character design in this dynamic course! Explore shape language, anatomy rules, and motifs to craft animation-ready characters. Gain drawing tips, hacks, and Procreate mastery (or any drawing app). Ideal for artists seeking to elevate their craft.
Explore this Course ➔
Elevate your freelance motion design career with our guide to client success. Master a repeatable method for finding, contacting, and landing clients. Learn to identify prospects, nurture leads, and develop a thriving freelance philosophy amidst chaos.
Explore this Course ➔
Rev up your editing skills with After Effects! Learn to use it for everyday needs and craft dynamic templates (Mogrts) for smarter teamwork. You'll master creating animated graphics, removing unwanted elements, tracking graphics, and making customizable templates.
Explore this Course ➔
Stand out with Demo Reel Dash! Learn to spotlight your best work and market your unique brand of magic. By the end, you'll have a brand new demo reel and a custom campaign to showcase yourself to an audience aligned with your career goals.
Explore this Course ➔
Illuminate your 3D skills with Lights, Camera, Render! Dive deep into advanced Cinema 4D techniques with David Ariew. Master core cinematography skills, gain valuable assets, and learn tools and best practices to create stunning work that wows clients.
Explore this Course ➔
Master After Effects at your own pace with Jake Bartlett's beginner course. Perfect for video editors, you'll learn to create stylish animated graphics, remove unwanted elements, and track graphics into shots. By the end, you'll be equipped for everyday AE needs and more.
Explore this Course ➔Revolutionize your Premiere workflow with customizable AE templates! Master creating dynamic Motion Graphics Templates (Mogrts) in After Effects to speed up your team's work. By the end, you'll craft easily-customizable templates for seamless use in Premiere Pro.
Explore this Course ➔

Not sure where to start?
If you’re a beginner, here are some great courses to help you get started:

After Effects Kickstart
Dive into the fundamentals of motion design with our most popular (and recently updated) After Effects course.

Photoshop + Illustrator Unleashed
Master the basics of Photoshop and Illustrator and gain invaluable insights in this introductory level course.

Design Kickstart
An introduction to the design principles behind all great work.
More Advanced?
If you’re a more advanced student looking to up your game, here are some great options:

Animation Bootcamp
Learn the art and principles of creating beautiful movements in Adobe After Effects.

Design Bootcamp
Learn to design for motion in this intermediate-level, project-based course.
Cinema 4D Basecamp
Learn Cinema 4D from the ground up in this exciting introductory C4D course.
Now is the time to learn the skills you need to advance in your motion design career:


