


Learn how to use the Track Mattes feature in After Effects to leverage still images, video clips, graphics, text and generated shapes to create variable transparencies in other layers within your motion graphic design.
Ever played around with Track Mattes in Adobe After Effects, only to find yourself lost and confused? Unaware Track Mattes even existed?
Track mattes represent an essential element of any motion designer's or visual effects artist's workflow.
No matter your level of knowledge or expertise, or lack there of, with this how-to guide you'll learn when and where to apply track mattes within your MoGraph project in After Effects — and how to choose among the four available track matte options.
What are Track Mattes in After Effects?
To put it simply, a track matte is a still image, video clip, graphic, piece of text or shape used to create a variable transparency in another layer within your motion graphic design. The track matte carves out a portion of a layer, exposing the layer beneath it.
Ideal for reveals, keying out, and generating shapes, what makes a track matte unique is that it remains independent of all other layers in your project.
With a track matte, you create a top layer that provides the alpha, or luminance, and a bottom later that contains the imagery that will be shown, allowing you to produce animations with far fewer steps and greater ease than using a traditional mask.

So, where in After Effects do I find the track matte options?
Finding the Track Matte Tool in After Effects
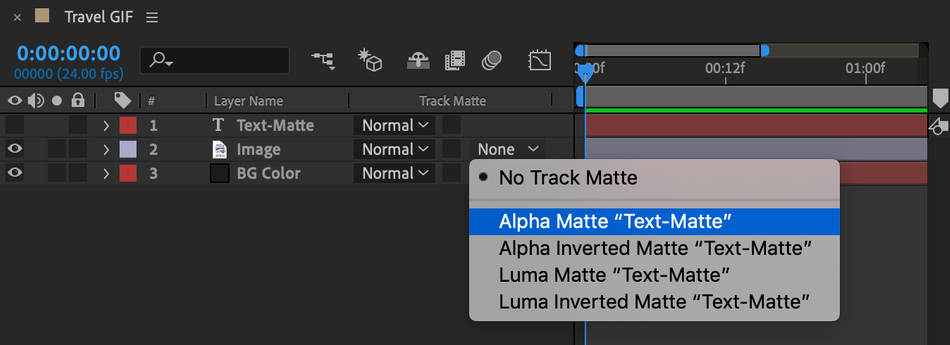
If the Track Mattes option is missing from your After Effects timeline panel, right-click the section above your layers, navigate to the Columns menu, and enable Modes, as seen below.
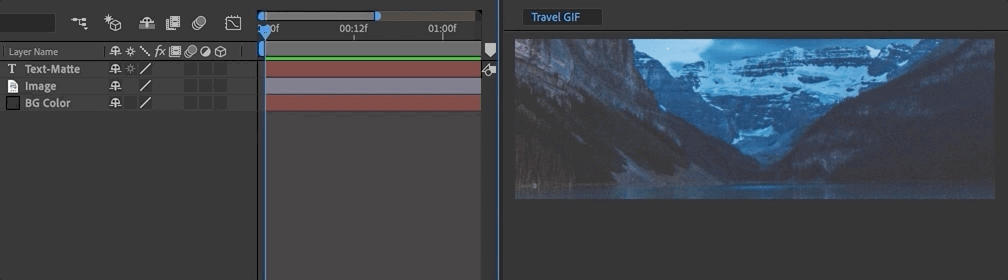
Blending Modes, Preserve Underlying Transparency, and Track Mattes (TrkMat) should now all be available.
Applying a Track Matte
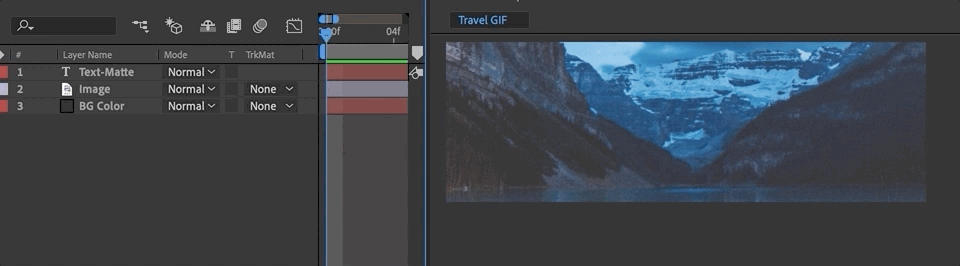
To apply a track matte, you'll need two layers:
- The top layer will provide the alpha, or luminance, information
- The bottom layer below will act as a fill
You will only see the bottom layer content; the top layer will provide new borders for the bottom layer, as seen below.
So when should I use a track matte, instead of a mask?
When to Use Track Mattes in After Effects
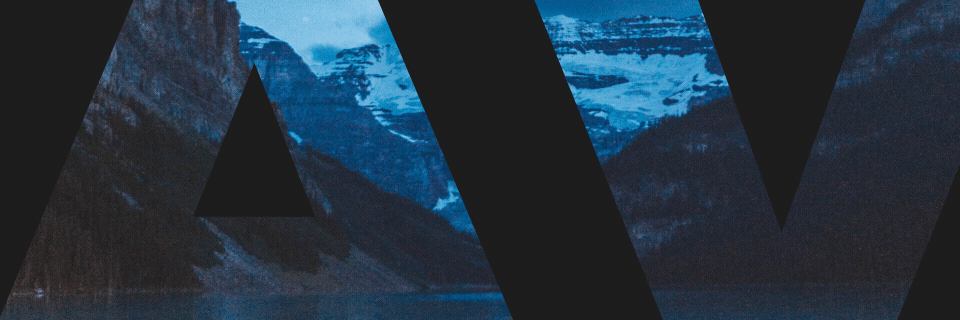
Unless you like tedious work, use a track matte whenever you want to use a text (or other) layer as a controlled 'window' into an image (remember the "When In Rome" graphic above?).
With masking, you'd need a mask for each and every character in the text. Imagine animating a whole paragraph, and needing to mask every character of every word!
Instead, use the text layer's alpha channel as a track matte — and you can animate the text in its entirety. Plus, you can add effects to the text layer, or even change the font, while keeping your animation in tact.
So what about those four track matte options you referenced?
Understanding All Four Track Matte Options in After Effects
The four track matte options in After Effects are:
- Alpha Matte
- Alpha Inverted Matte
- Luma Matte
- Luma Inverted Matte
To determine which track matte to use, you'll need to know the difference between alpha and luma modes.
THE ALPHA TRACK MATTES IN AFTER EFFECTS
When you choose the Alpha Matte option, you're asking After Effects to use the alpha channel of the layer above as a mask for the layer below — and it will use any pixel above 0% opacity as the mask.
When you choose the Alpha Inverted Matte option, you're asking After Effects to use the negative space surrounding the alpha channel in the layer above — and the mask will treat any pixel at 0% as if it were at 100% opacity.

THE LUMA TRACK MATTES IN AFTER EFFECTS
Choosing the Luma Matte option asks After Effects to use the brightness, or luminance, of the top layer as a mask for the bottom layer.
Playing around with this mode can yield some interesting effects that cannot be achieved with alpha matting, especially when compositing layers.
Choosing the Luma Inverted Matte option asks After Effects to do the opposite, using the top layer's low-luminance areas as a matte.

ADDITIONAL BACKGROUND ON ALPHA V. LUMA: WHEN TO USE EACH
ALPHA CHANNELS
With any MoGraph software, the alpha channel dictates how opaque, or transparent, the pixels in your motion graphic will be.
Alpha channels are usually used when a video or image is inserted above another video/image.
LUMA CHANNELS
Color for video is divided into three color channels: red, green, and blue (RGB), with each color assigned a range of values from 0 to 255. The higher the value, the brighter the color.
If you want to increase brightness, you can raise the luminance value of each channel or a single channel. For example, if you have a square and strip away the red and green channels, setting them to 0, but you maintain the luminance value of the blue channel at 255, your square will remain at max brightness.
When using a luma matte, lowering your max value will make your matte less opaque.
Want to Fast Track Your After Effects Expertise?
No problem. Follow either or both of these paths:
- After Effects Kickstart. In this course taught by Nol Honig, founder of The Drawing Room, regular Motionographer contributor and award-winning professor at Parsons School of Design, you'll learn how to use After Effects through real-world projects and feedback from our staff and a network of motion design students.
- 30 Days of After Effects. Through this free series of After Effects tutorials, you'll learn the skills and knowledge necessary to become a motion design master.

Dive into real-time 3D with our Unreal Engine beginner's course by Jonathan Winbush. Master importing assets, world-building, animation, and cinematic sequences to create stunning 3D renders in no time! Perfect for motion designers ready to level up.
Explore this Course ➔
Unlock the secrets of character design in this dynamic course! Explore shape language, anatomy rules, and motifs to craft animation-ready characters. Gain drawing tips, hacks, and Procreate mastery (or any drawing app). Ideal for artists seeking to elevate their craft.
Explore this Course ➔
Elevate your freelance motion design career with our guide to client success. Master a repeatable method for finding, contacting, and landing clients. Learn to identify prospects, nurture leads, and develop a thriving freelance philosophy amidst chaos.
Explore this Course ➔
Rev up your editing skills with After Effects! Learn to use it for everyday needs and craft dynamic templates (Mogrts) for smarter teamwork. You'll master creating animated graphics, removing unwanted elements, tracking graphics, and making customizable templates.
Explore this Course ➔
Stand out with Demo Reel Dash! Learn to spotlight your best work and market your unique brand of magic. By the end, you'll have a brand new demo reel and a custom campaign to showcase yourself to an audience aligned with your career goals.
Explore this Course ➔
Illuminate your 3D skills with Lights, Camera, Render! Dive deep into advanced Cinema 4D techniques with David Ariew. Master core cinematography skills, gain valuable assets, and learn tools and best practices to create stunning work that wows clients.
Explore this Course ➔
Master After Effects at your own pace with Jake Bartlett's beginner course. Perfect for video editors, you'll learn to create stylish animated graphics, remove unwanted elements, and track graphics into shots. By the end, you'll be equipped for everyday AE needs and more.
Explore this Course ➔Revolutionize your Premiere workflow with customizable AE templates! Master creating dynamic Motion Graphics Templates (Mogrts) in After Effects to speed up your team's work. By the end, you'll craft easily-customizable templates for seamless use in Premiere Pro.
Explore this Course ➔

Not sure where to start?
If you’re a beginner, here are some great courses to help you get started:

After Effects Kickstart
Dive into the fundamentals of motion design with our most popular (and recently updated) After Effects course.

Photoshop + Illustrator Unleashed
Master the basics of Photoshop and Illustrator and gain invaluable insights in this introductory level course.

Design Kickstart
An introduction to the design principles behind all great work.
More Advanced?
If you’re a more advanced student looking to up your game, here are some great options:

Animation Bootcamp
Learn the art and principles of creating beautiful movements in Adobe After Effects.

Design Bootcamp
Learn to design for motion in this intermediate-level, project-based course.
Cinema 4D Basecamp
Learn Cinema 4D from the ground up in this exciting introductory C4D course.
Now is the time to learn the skills you need to advance in your motion design career:


