


Cinema4D is an essential tool for any Motion Designer, but how well do you really know it?
How often do you use the top menu tabs in Cinema4D? Chances are, you probably have a handful of tools you use, but what about those random features you haven’t tried yet? We're taking a look at the hidden gems in the top menus, and we're just getting started.

In this tutorial, we’ll be doing a deep dive on the Modes tab. Similar to the Create tab, Modes is almost completely integrated into Cinema 4D’s interface. When you first open C4D for the first time, they’ll be on the left side of the screen. Any Cinema 4D user should be pretty familiar with these tools. However, there are some hidden capabilities that you may have not known about.
An Ode to Modes
Here are the 3 main things you should use in the Cinema4D Modes menu:

- Model Mode
- Points, Edges, and Polygon Modes
- Solo Modes
Modes > Model Mode
This is the default mode for interacting with any object in your scene. Basically, use this mode if you want to move an entire object. Pretty straightforward.
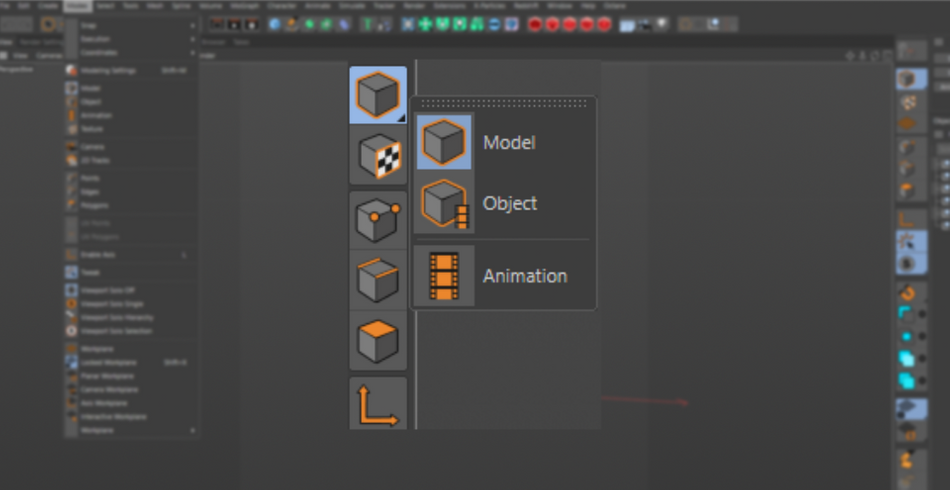
There is a second Model Mode called Object Mode. While very similar, the key difference is in how it handles the parameters of an object.
It’s much easier to illustrate with a Cube.

Select your cube in Model mode. Then hit T for scale. As you scale up and down, you’ll notice that the Object Properties change. The XYZ sizes will grow and shrink.

Now do it with the Object mode and try the same action. You’ll notice that the properties remain unchanged. However, if you look inside your Cube’s Coordinates, the Scale will be the changing variable.
x
Why is that? The simplest way to explain it is that Model Mode changes the object on a physical level: a 2cm polygon will then scale to a 4cm; A 2cm Bevel will become a 4cm bevel; etc.
Meanwhile, the Object mode freezes all transformations on your object and applies a multiplier. So all physical properties remain the same, but how they are presented in the viewport is affected.

This mode is extremely useful when using Rigged Characters. If you scale a character using Model mode, you’ll see a very strange effect happen to your character where their bodies will be deformed and look like Slenderman. This is due to the Joints being scaled and stretching the polygons with them.
However, if you scale using Object mode, all transformations are frozen and your character will scale proportionally.

Modes > Points, Edges and Polygon Modes
If you are into modeling, these modes should be very familiar to you. If you need to move some points around, simply go to Points Mode. And it's the same with edges and polygons.

Any modeling tool, such as Beveling or Extrusion, works on each point in different ways. For example, using a Bevel on your Polygon will create a set of polygons in the shape of the original.

However, on a Point, Bevel will split the point and push away from the origin. The number of points is determined by the number of edges connected to the original point.
Now let's say you select a polygon, you extrude it, and now you want to select the new Edges so you can bevel them. You could switch to Edge Mode and manually select the new edges.

Or, you could switch to Edge Mode while holding down Ctrl or Shift. This will transfer your selection to the new mode and allow you to quickly make the modeling adjustments.

Hit Enter/Return while a polygonal object is selected and your cursor is hovering over the Viewport to toggle between Point, Edge, or Polygon mode.
Modes > Solo Modes
We all love the Solo button in After Effects. It allows us to quickly troubleshoot our compositions, and also allows us to run the animation without it needing to calculate the other elements in the comp. Cinema 4D has its own version that works in a similar fashion.

By default, Solo Mode Off will be active. So once you decide to solo an object, simply hit the orange Solo button and you’re on your way.

Keep in mind that the default Solo mode will only solo the selected object(s). So if you have an object with Children, you’re going to want to switch over to Solo Hierarchy so that the children are selected. This is especially useful for objects inside of Nulls.

Now lets say you want to select a new object to solo. By default, you’ll need to select the object in the Object Manager and then hit the Solo button again.
However, there’s a white Solo button that can be toggled under the other 2. Toggle this button and, from now on, whatever object you select will immediately be solo’d.

Why isn't this activated by default? Well, sometimes you need to select a different object to check a few settings without actually switching to it.
Look at you!
As you can see, the Modes Menu contains a lot of easy shortcuts to speed up your workflow. They almost always work in conjunction with each other to help you organize your scene. Modifier keys like Shift are very useful here too. But most importantly, make sure to use Object Mode for when scaling your rigged characters! Dont give yourself nightmares!

Cinema4D Basecamp
If you're looking to get the most out of Cinema4D, maybe it's time to take a more proactive step in your professional development. That's why we put together Cinema4D Basecamp, a course designed to get you from zero to hero in 12 weeks.
And if you think you're ready for the next level in 3D development, check out our all new course, Cinema 4D Ascent!

Dive into real-time 3D with our Unreal Engine beginner's course by Jonathan Winbush. Master importing assets, world-building, animation, and cinematic sequences to create stunning 3D renders in no time! Perfect for motion designers ready to level up.
Explore this Course ➔
Unlock the secrets of character design in this dynamic course! Explore shape language, anatomy rules, and motifs to craft animation-ready characters. Gain drawing tips, hacks, and Procreate mastery (or any drawing app). Ideal for artists seeking to elevate their craft.
Explore this Course ➔
Elevate your freelance motion design career with our guide to client success. Master a repeatable method for finding, contacting, and landing clients. Learn to identify prospects, nurture leads, and develop a thriving freelance philosophy amidst chaos.
Explore this Course ➔
Rev up your editing skills with After Effects! Learn to use it for everyday needs and craft dynamic templates (Mogrts) for smarter teamwork. You'll master creating animated graphics, removing unwanted elements, tracking graphics, and making customizable templates.
Explore this Course ➔
Stand out with Demo Reel Dash! Learn to spotlight your best work and market your unique brand of magic. By the end, you'll have a brand new demo reel and a custom campaign to showcase yourself to an audience aligned with your career goals.
Explore this Course ➔
Illuminate your 3D skills with Lights, Camera, Render! Dive deep into advanced Cinema 4D techniques with David Ariew. Master core cinematography skills, gain valuable assets, and learn tools and best practices to create stunning work that wows clients.
Explore this Course ➔
Master After Effects at your own pace with Jake Bartlett's beginner course. Perfect for video editors, you'll learn to create stylish animated graphics, remove unwanted elements, and track graphics into shots. By the end, you'll be equipped for everyday AE needs and more.
Explore this Course ➔Revolutionize your Premiere workflow with customizable AE templates! Master creating dynamic Motion Graphics Templates (Mogrts) in After Effects to speed up your team's work. By the end, you'll craft easily-customizable templates for seamless use in Premiere Pro.
Explore this Course ➔

Not sure where to start?
If you’re a beginner, here are some great courses to help you get started:

After Effects Kickstart
Dive into the fundamentals of motion design with our most popular (and recently updated) After Effects course.

Photoshop + Illustrator Unleashed
Master the basics of Photoshop and Illustrator and gain invaluable insights in this introductory level course.

Design Kickstart
An introduction to the design principles behind all great work.
More Advanced?
If you’re a more advanced student looking to up your game, here are some great options:

Animation Bootcamp
Learn the art and principles of creating beautiful movements in Adobe After Effects.

Design Bootcamp
Learn to design for motion in this intermediate-level, project-based course.
Cinema 4D Basecamp
Learn Cinema 4D from the ground up in this exciting introductory C4D course.
Now is the time to learn the skills you need to advance in your motion design career:


