


Harness the power of expressions to easily create trails that follow an object in After Effects.
Admit it. You love expressions. It's alright... you're among friends, nothing to be ashamed of. The truth is, most After Effects artists want to learn the dark art of expressions, but they don't really know where to start. Lucky for you, Zack Lovatt is on the case.
In this tutorial, Expression Session co-instructor Zack Lovatt will be showing you a simple expression that you can use to create "follow" animations with ease. He also shows you how to build a flexible rig for your new animation rig.
If you're looking for an easy intro to the power of expressions, look no further.

Dive into real-time 3D with our Unreal Engine beginner's course by Jonathan Winbush. Master importing assets, world-building, animation, and cinematic sequences to create stunning 3D renders in no time! Perfect for motion designers ready to level up.
Explore this Course ➔
Unlock the secrets of character design in this dynamic course! Explore shape language, anatomy rules, and motifs to craft animation-ready characters. Gain drawing tips, hacks, and Procreate mastery (or any drawing app). Ideal for artists seeking to elevate their craft.
Explore this Course ➔
Elevate your freelance motion design career with our guide to client success. Master a repeatable method for finding, contacting, and landing clients. Learn to identify prospects, nurture leads, and develop a thriving freelance philosophy amidst chaos.
Explore this Course ➔
Rev up your editing skills with After Effects! Learn to use it for everyday needs and craft dynamic templates (Mogrts) for smarter teamwork. You'll master creating animated graphics, removing unwanted elements, tracking graphics, and making customizable templates.
Explore this Course ➔
Stand out with Demo Reel Dash! Learn to spotlight your best work and market your unique brand of magic. By the end, you'll have a brand new demo reel and a custom campaign to showcase yourself to an audience aligned with your career goals.
Explore this Course ➔
Illuminate your 3D skills with Lights, Camera, Render! Dive deep into advanced Cinema 4D techniques with David Ariew. Master core cinematography skills, gain valuable assets, and learn tools and best practices to create stunning work that wows clients.
Explore this Course ➔
Master After Effects at your own pace with Jake Bartlett's beginner course. Perfect for video editors, you'll learn to create stylish animated graphics, remove unwanted elements, and track graphics into shots. By the end, you'll be equipped for everyday AE needs and more.
Explore this Course ➔Revolutionize your Premiere workflow with customizable AE templates! Master creating dynamic Motion Graphics Templates (Mogrts) in After Effects to speed up your team's work. By the end, you'll craft easily-customizable templates for seamless use in Premiere Pro.
Explore this Course ➔

What are you going to learn in this tutorial?
This tutorial is a short intro to the power of expressions. It's aimed at After Effects artists who may be aware of expressions, but who haven't gotten comfortable with them yet. You'll be building a simple, but incredibly useful animation rig.
THE BASICS OF VALUEATTIME()
This simple piece of code gives you the power to travel through time! (sort of)
HOW EXPRESSIONS REFERENCE PROPERTIES IN AFTER EFFECTS
Don't fear the code... the expression language is actual pretty simple once you learn a few things about how it works.
USING LAYER INDEXES TO AUTOMATE CALCULATIONS
Learn how After Effects numbers your layers so that you can create flexible rigs that scale automatically.
ADDING EXPRESSION CONTROLS TO YOUR RIG
You'll feel like a wizard after you add some simple controls to your rig that give you the ability to change things with a flick of your wacom stylus.
HOW TO THINK WHEN CREATING EXPRESSIONS
The key to mastering expressions is to learn to think like a coder. Zack is amazing at teaching the principles behind everything, so get ready to be enlightened.
Master Expressions in After Effects
If you enjoyed diving into the world of code, there is plenty more where that came from in our new course, Expression Session. In just 12 weeks, we'll teach you how to approach, write and implement expressions in After Effects. Helping you go from rookie to seasoned coder.
Expression Session is jam packed with best-practices, coding examples, and real-world challenges featuring amazing artwork from some of the best designers in the industry. Our teaching-assistants are standing by to help you debug your code and to high-five you (virtually) when you succeed. See you in class!
-----------------------------------------------------------------------------------------------------------------------------------
Tutorial Full Transcript Below 👇:
Zack Lovatt (00:00): Hi, I'm Zack Lovatt. And in the short video, I'm going to show you how to use a simple expression to create a trailing or following object in after effects, let's go Expressions or emotion designer, secret weapon. And once you learn to use them, you can save yourself a huge amount of time and pain. If you're ready to gain a thorough grasp of after effects, expressions, and how to use these powerful tools, check out expression session in school of motion, you can also download the project files I'm using in this video to follow them with or practice with. After you're done watching this video, the details are in the description.
Zack Lovatt (00:43): So let's see, we've got some text here and we want to create a really cheesy retro standard animation thing. All right. So this is what we've got so far. Pretty good. I know. So one way to kind of stagger, this would be to duplicate the layer, open up its key frames. Take them, move them down a little bit in time. I'm going to duplicate the layer, open up its key frames, or let's just move these ones down a little bit in time. Duplicate the layer, open up that. Okay. So wait, let me just do, I think you're kind of getting the idea this works, but it's really annoying. And now if we want to go and change the original animation to be, you know, a different shape or have the keys somewhere different. Now we've got to go through that whole process over again for each of these child lists. That sucks. Thankfully with the power of expressions, we can create a pretty simple rig to help us out through this.
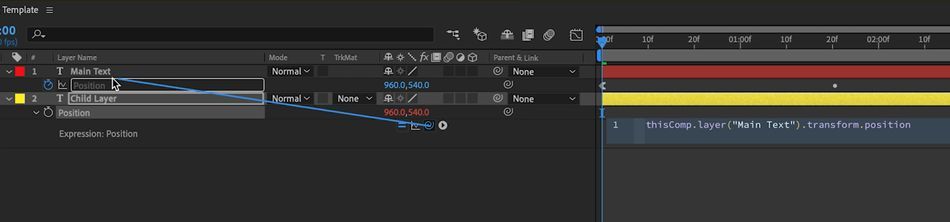
Zack Lovatt (01:41): The premise is still the same. We're going to duplicate the layer and offset the key frames, but we don't want to offset the key things by hand. Luckily, we can use an expression function called value at time to help us with that offsetting the way we're going to do this is to first duplicate the layer like we saw. And for clarity, I'm going to rename this. Let's say child layer, maybe call it yellow. And underneath the position, I'm going to delete these key frames. Cause we don't want it to have its own key frames. We want it to look at the key frames of this layer and then offset it in time to delete those, just like clicking the stopwatch. I'm going to hold option or ultimate click on the stopwatch to get this expression setup. So from here, the first thing to do is to pick whip right up to that layers position. Now, if we click away nothing's happening, well, there is actually something happening or child layer. It's just following the exact same position as the main life. So I'm going to actually make this child Blair let's make it a different color.
Zack Lovatt (02:49): So now we've got the main layer, which is gray up top, the child there, which is red below just to make it a little bit easier to see now what this expression is doing is giving us the value of this last position at the current time. But if we put the value at a different time, we can write dot value at time, put in little brackets and click away. Okay, well, we're getting an error errors. Aren't scary. They're pretty helpful. And can help us figure out what we're supposed to do up here. It says value at time needs exactly one argument, right? Well, we've got this sort of brackets and inside of them, it needs an argument. That's what it's called. When you put something in the brackets, the argument that this function needs is the time at which you want to get the value.
Zack Lovatt (03:38): Okay. So easy. There's actually this built-in keyword and aftereffects called time. And what this word means is any time the expression sees this word, it's going to replace it with the number representing the current time in the comp. So let's click away and nothing's really changed. Let me just go to one second in time to kind of explain this work time. So as I said, this word really needs a number. Well because the current time in the comp is one second. This word time is actually one. And if I put it up here, it's two and here it's three and maybe midway it's 2.5 and okay. That kind of makes sense, but how come we're not seeing anything different? Well, that's because we've just told the expression to give me the position of this text at the current time. Well, getting at the current time, that's the same as not having any of this.
Zack Lovatt (04:35): Like this is the current time parenting is the current time. So all of this isn't doing a lot. Well, okay. Then how do we use this? What we want to do is offset the time that we're giving it. So instead of the time right now, what if we were to say, give me the time a little bit ago? Like, what if we said, give me the time half a second ago. Well, we just went through and said that this number, this word rather is really a number. So if we're at 2.5 right now, how do we get to two? Well, we just say, you know, time minus 0.5, we'll make this number 0.5 smaller, or it'll give us the time, half a second ago. So if we click away here, this red text is now super offset. This function, this expression is saying, give me the value of that position half a second ago.
Zack Lovatt (05:28): So as we scrubbed through first, the gray moves and then half a second later, the red layer moves and it's following that. And what if it's not half a second? What if we say a quarter of a second or 0.2, five, it's going to do the same thing just a little bit closer. Now, one way to sort of visualize this is to open up the graph editor and the graph editor. You probably know that we can click on position and we're going to see the X and Y curves as they're curving there. And I'm just going to click this button here to lock it. So that's always showing inside the graph editor. Now, if we come down toward child layer, we're just seeing these horizontal lines. That's because it's just showing the actual animation of the X and Y which, well, there isn't any, hopefully though, there's this little button here saying show post expression graph.
Zack Lovatt (06:18): And what this will do is show us the X and Y position after the expressions been calculated. So that's a little bit easier to see in practice than just talking about it. So I'm gonna click this and now we're seeing the second set of curves after the first one, I get there's a lot going on here. If the idea is that the second set further to the right is the same as the first, but a little offset and tight. I'm going to go ahead and change this value from minus a quarter second to minus half a second and see what happens the space between the curves.
Zack Lovatt (06:52): So it's actually made that get bigger if the exact same path just offset in Thai, alright, let's get out of here. Turn these off back to our main crop. So now that we've got this working for one layer, let's add another child layer and see it offset again. So I'm going to duplicate the child layer and oh, well nothing's actually offsetting. So let's go into the position of both of these layers and take a look at what's happening. What both of these have the same position value. They're both offset half a second for the main one, but they're the same as each other. Now this has to do with how we're telling it what layer to look at for the position. And here we're using this word layer with brackets and then quotation marks and writing main text. This is how we're targeting, what layer to get the position of.
Zack Lovatt (07:44): Now there's a few ways you can use this layer function. The first way is like this. You put in quotes the name of the layer, and it's going to say, okay, give me that layers position. Well, you can also put a number in here. If we put the number one, that's going to say, give me layer number one in the cop now. Okay, well what's layer number one. That's this number right here under the number. It's the layers index. The index is just the layer number. All right. So if we say layer one and click away, it's still giving the same thing. This comp dot layer one is the same as this comp dot layer main text. And they're both just pulling this. All right. So we're kind of getting the pieces here. Remember how back here we're saying, give me a value time and offset it a little bit time minus 0.5.
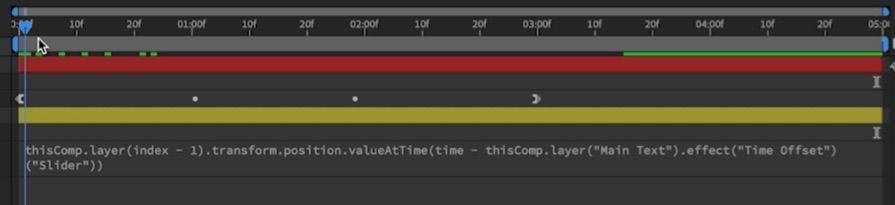
Zack Lovatt (08:35): Well, what if we could say, instead of give me layer, number one, give me the layer before this one. Well, to do that, we kind of need two pieces of info. First. We need the current layers index. So how do I get this number to, and to do that? We're first going to say the word index, just like time, the word index is a handy keyword. That'll give you this as a number. So in this case, it's two. And to get the letter before it, we're going to say minus one. So altogether we're saying, give me the layer whose index is one before the current one, which in this case is index two minus one is one. And it's the exact same thing where this really becomes useful is when we put it on the next layer. So I'm going to copy this and drop it into here and narrow getting two copies.
Zack Lovatt (09:26): The idea here is that this layer is looking at layer number one, and then offsetting half a second. This layer is looking at layer number two and offset by half a second. And the more layers we duplicate the further back in time, each subsequent layer is going to be so to duplicate well nothing's happening because the animation hasn't started that far back. But if we play forward and time, we're going to see each for child layers, kind of cascading out from the center during their little wiggly animation, and then coming back home to actually see it finished. We need more time at the end here, but you get the idea or actually let me just shift this. They kind of move around. They wiggle and eventually come and close.
Zack Lovatt (10:19): So the last sort of piece here is that this half a second delay is a really long time. Now I just want a simpler, cleaner way to organize this so that if I'm going to change this value from 0.5, back to a quarter second or a third or something else, or heck even animated, I can do that all in one spot super easily. Now to do this, we're going to create a little controller and I'm going to put that right on this main text layer, just to kind of keep it all compact and to go into the effect controls for that main text layer. I'm going to right click, go to expression controls and choose a slider control. This I'm going to name time offset. And this is going to be the amount of time to offset each layer from the one before it, I'm going to say minus 0.5, which is minus half of a second, heck let's just say 0.5 and make the numbers a little easier, you know, lock this so that we're seeing.
Zack Lovatt (11:17):It's always, and it's not going to disappear. I'm just going to go ahead and delete each of these childhoods because the expressions are the exact same. I know that I can just read, duplicate them to get that same effect. So deleting and reduplicating is just a little faster than modifying all these expressions. One by one. Now to get that number in to this value here, I'm just going to take the Pickwick, drag it up to that slider. It's going to add in a bunch more text in here and for now don't worry about it as we click away. Well, nothing's changed at the beginning. You can see that it is actually offsetting by that amount of time. So let's go and duplicate this a whole bunch. And we're seeing exactly what we're seeing before. However, because they're all looking at the slider. We can change this value down from 0.5 to maybe 0.1. And it's going to make that offset much, much tighter than it was before.
Zack Lovatt (12:17): With this technique, you create super complex rigs, all based on your layer stack and a few handy danders sliders. Now that we've caught this all working, we can drop it into our rat as heck scene and watch it go. This technique is super customizable and we've only scratched the surface of what you can do with them. Make sure to hit subscribe. If you want more tips like this one and check the descriptions. You can download the project files from this video. If you want to dive into the world of expressions with the help of experienced industry pros and fun real-world challenges, check out expression session from school of motion by.
Not sure where to start?
If you’re a beginner, here are some great courses to help you get started:

After Effects Kickstart
Dive into the fundamentals of motion design with our most popular (and recently updated) After Effects course.

Photoshop + Illustrator Unleashed
Master the basics of Photoshop and Illustrator and gain invaluable insights in this introductory level course.

Design Kickstart
An introduction to the design principles behind all great work.
More Advanced?
If you’re a more advanced student looking to up your game, here are some great options:

Animation Bootcamp
Learn the art and principles of creating beautiful movements in Adobe After Effects.

Design Bootcamp
Learn to design for motion in this intermediate-level, project-based course.
Cinema 4D Basecamp
Learn Cinema 4D from the ground up in this exciting introductory C4D course.
Now is the time to learn the skills you need to advance in your motion design career:


