


How the Disk Cache in After Effects Helps Your Workflow.
You may or may not have heard of the disk cache in After Effects, but as you’ll come to find out the disk cache is a huge deal in After Effects. In fact it's not just a huge deal, it's a massive deal, and a crucial piece of your workflow.
Whether you've know it or not, you’ve been using disk cache for as long as you've been using After Effects. The Disk Cache is such an essential part of the Motion Design process that we thought it'd be helpful to talk about what disk cache is and how it can help you in After Effects.
What is Disk Cache?
Technically a Disk Cache isn’t just an After Effects thing, it's far more reaching than that, because most software utilizes some type of disk caching. Essentially what disk cache means is that the software holds data that has recently been read and stores it in a cache, so that way when it needs to read it again it can do so more quickly.
How Does Disk Cache Work in After Effects?
When you put together a comp, After Effects stores rendered frames and images using the RAM preview, this is so adjusting and editing of your comp goes more smoothly. AE won't cache frames that can easily be rendered, such as solid colors or text, just frames where composites have taken place and preview rendering is necessary. Now there are two ways that AE is pre-rendering and caching your comp. Let’s take a look at both.
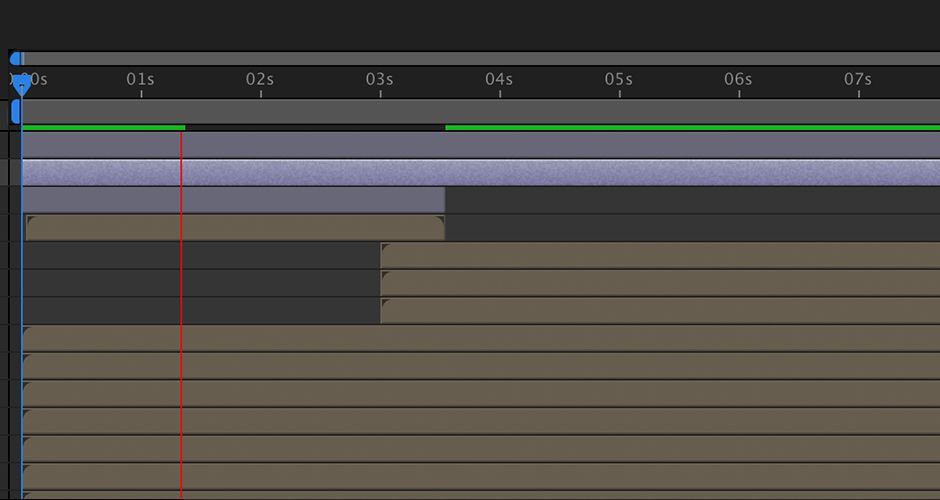
DISK CACHE
- Saved to: Hard Drive
- Indicator: Blue Bar
Disk cache just as we mentioned above, where data from the preview render is stored in a cache directory. This allows After Effects to read the data quicker, thus giving you a faster preview. You can see that your comp has been cached to the disk by seeing a blue bar in the time ruler of the Timeline.
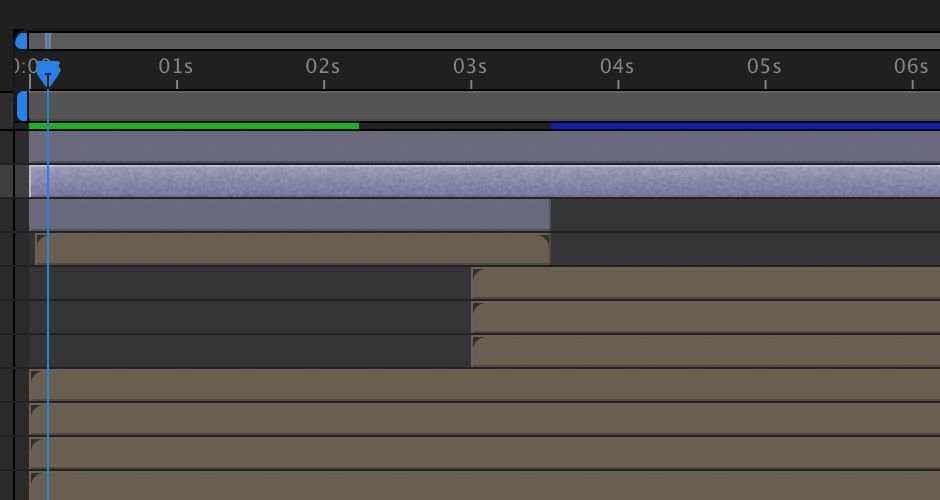
RAM (RANDOM ACCESS MEMORY) CACHE
- Saved To: RAM
- Indicator: Green Bar
After Effects will cache RAM Preview frames within its RAM Cache in the same way that it caches data to the disk. This again is all a way for After Effects to increase its productivity for the user by not having to re-render a comp every single time you hit the spacebar. You can see RAM Cache working by finding a green bar in the time ruler of the Timeline. When you preview your timeline After Effects will move any necessary footage from the disk cache into your RAM Cache for playback.
Is Disk Cache and Ram Cache Using Hard Drive Space?
Kinda, both will utilize storage space on your computer. However, RAM preview will store to RAM and be erased when After Effects is closed. Disk Cache will store on your hard drive and will not be deleted when you close the software.
You should also note that over time your cache can get quite large and take up a lot of space on your Hard Drive. However, don’t worry you can clean things up and purge your system of that used disk space.
HOW TO ADJUST YOUR DISK CACHE SIZE
To see just how much space your disk cache is taking up, navigate to After Effects > Preferences > Media & Disk Cache. In the menu you can change the potential size of your disk cache. If you use After Effects a lot you can crank that number up to as much as you want. After Effects recommends that you use an SSD on a separate hard drive from your footage.
HOW TO CLEAR (PURGE) THE DISK CACHE IN AFTER EFFECTS
There are two ways to purge and clear out the Disk Cache. The first is to head up to Edit > Purge > All Memory & Disk Cache. Just be aware that this will purge your RAM Cache as well. The second option is going to be to head over to Preferences > Media & Disk Cache. Here you’ll find an option to “Empty Disk Cache.”

HOW TO CLEAR (PURGE) THE RAM CACHE IN AFTER EFFECTS
If you need to purge your RAM Cache before you quit After Effects then head up to Edit > Purge > All Memory. This will take care of the RAM Cache, just be aware that you’ll lose your preview progress and you’ll need to run RAM Preview again.
SO... IS THIS INFO REALLY GOING TO HELP ME OUT?
A big part of becoming a great designer in After Effects is working efficiently and quickly. One of the ways you can focus on creating stuff instead of waiting on your computer to render is by utilizing Disk Cache and RAM Preview to your advantage.

Dive into real-time 3D with our Unreal Engine beginner's course by Jonathan Winbush. Master importing assets, world-building, animation, and cinematic sequences to create stunning 3D renders in no time! Perfect for motion designers ready to level up.
Explore this Course ➔
Unlock the secrets of character design in this dynamic course! Explore shape language, anatomy rules, and motifs to craft animation-ready characters. Gain drawing tips, hacks, and Procreate mastery (or any drawing app). Ideal for artists seeking to elevate their craft.
Explore this Course ➔
Elevate your freelance motion design career with our guide to client success. Master a repeatable method for finding, contacting, and landing clients. Learn to identify prospects, nurture leads, and develop a thriving freelance philosophy amidst chaos.
Explore this Course ➔
Rev up your editing skills with After Effects! Learn to use it for everyday needs and craft dynamic templates (Mogrts) for smarter teamwork. You'll master creating animated graphics, removing unwanted elements, tracking graphics, and making customizable templates.
Explore this Course ➔
Stand out with Demo Reel Dash! Learn to spotlight your best work and market your unique brand of magic. By the end, you'll have a brand new demo reel and a custom campaign to showcase yourself to an audience aligned with your career goals.
Explore this Course ➔
Illuminate your 3D skills with Lights, Camera, Render! Dive deep into advanced Cinema 4D techniques with David Ariew. Master core cinematography skills, gain valuable assets, and learn tools and best practices to create stunning work that wows clients.
Explore this Course ➔
Master After Effects at your own pace with Jake Bartlett's beginner course. Perfect for video editors, you'll learn to create stylish animated graphics, remove unwanted elements, and track graphics into shots. By the end, you'll be equipped for everyday AE needs and more.
Explore this Course ➔Revolutionize your Premiere workflow with customizable AE templates! Master creating dynamic Motion Graphics Templates (Mogrts) in After Effects to speed up your team's work. By the end, you'll craft easily-customizable templates for seamless use in Premiere Pro.
Explore this Course ➔

Not sure where to start?
If you’re a beginner, here are some great courses to help you get started:

After Effects Kickstart
Dive into the fundamentals of motion design with our most popular (and recently updated) After Effects course.

Photoshop + Illustrator Unleashed
Master the basics of Photoshop and Illustrator and gain invaluable insights in this introductory level course.

Design Kickstart
An introduction to the design principles behind all great work.
More Advanced?
If you’re a more advanced student looking to up your game, here are some great options:

Animation Bootcamp
Learn the art and principles of creating beautiful movements in Adobe After Effects.

Design Bootcamp
Learn to design for motion in this intermediate-level, project-based course.
Cinema 4D Basecamp
Learn Cinema 4D from the ground up in this exciting introductory C4D course.
Now is the time to learn the skills you need to advance in your motion design career:


